It has been so long since I have blogged about open source technologies and I feel thirsty after finally getting to have a bit of “me time” during EID Al Adha Holidays (Eid Mubarak everyone reading this post), also for the last 2 years was a bit focused on learning Azure related technologies, especially Azure IoT so didnt get a lot of time to mess around with my homelab or upload videos and blog in general.
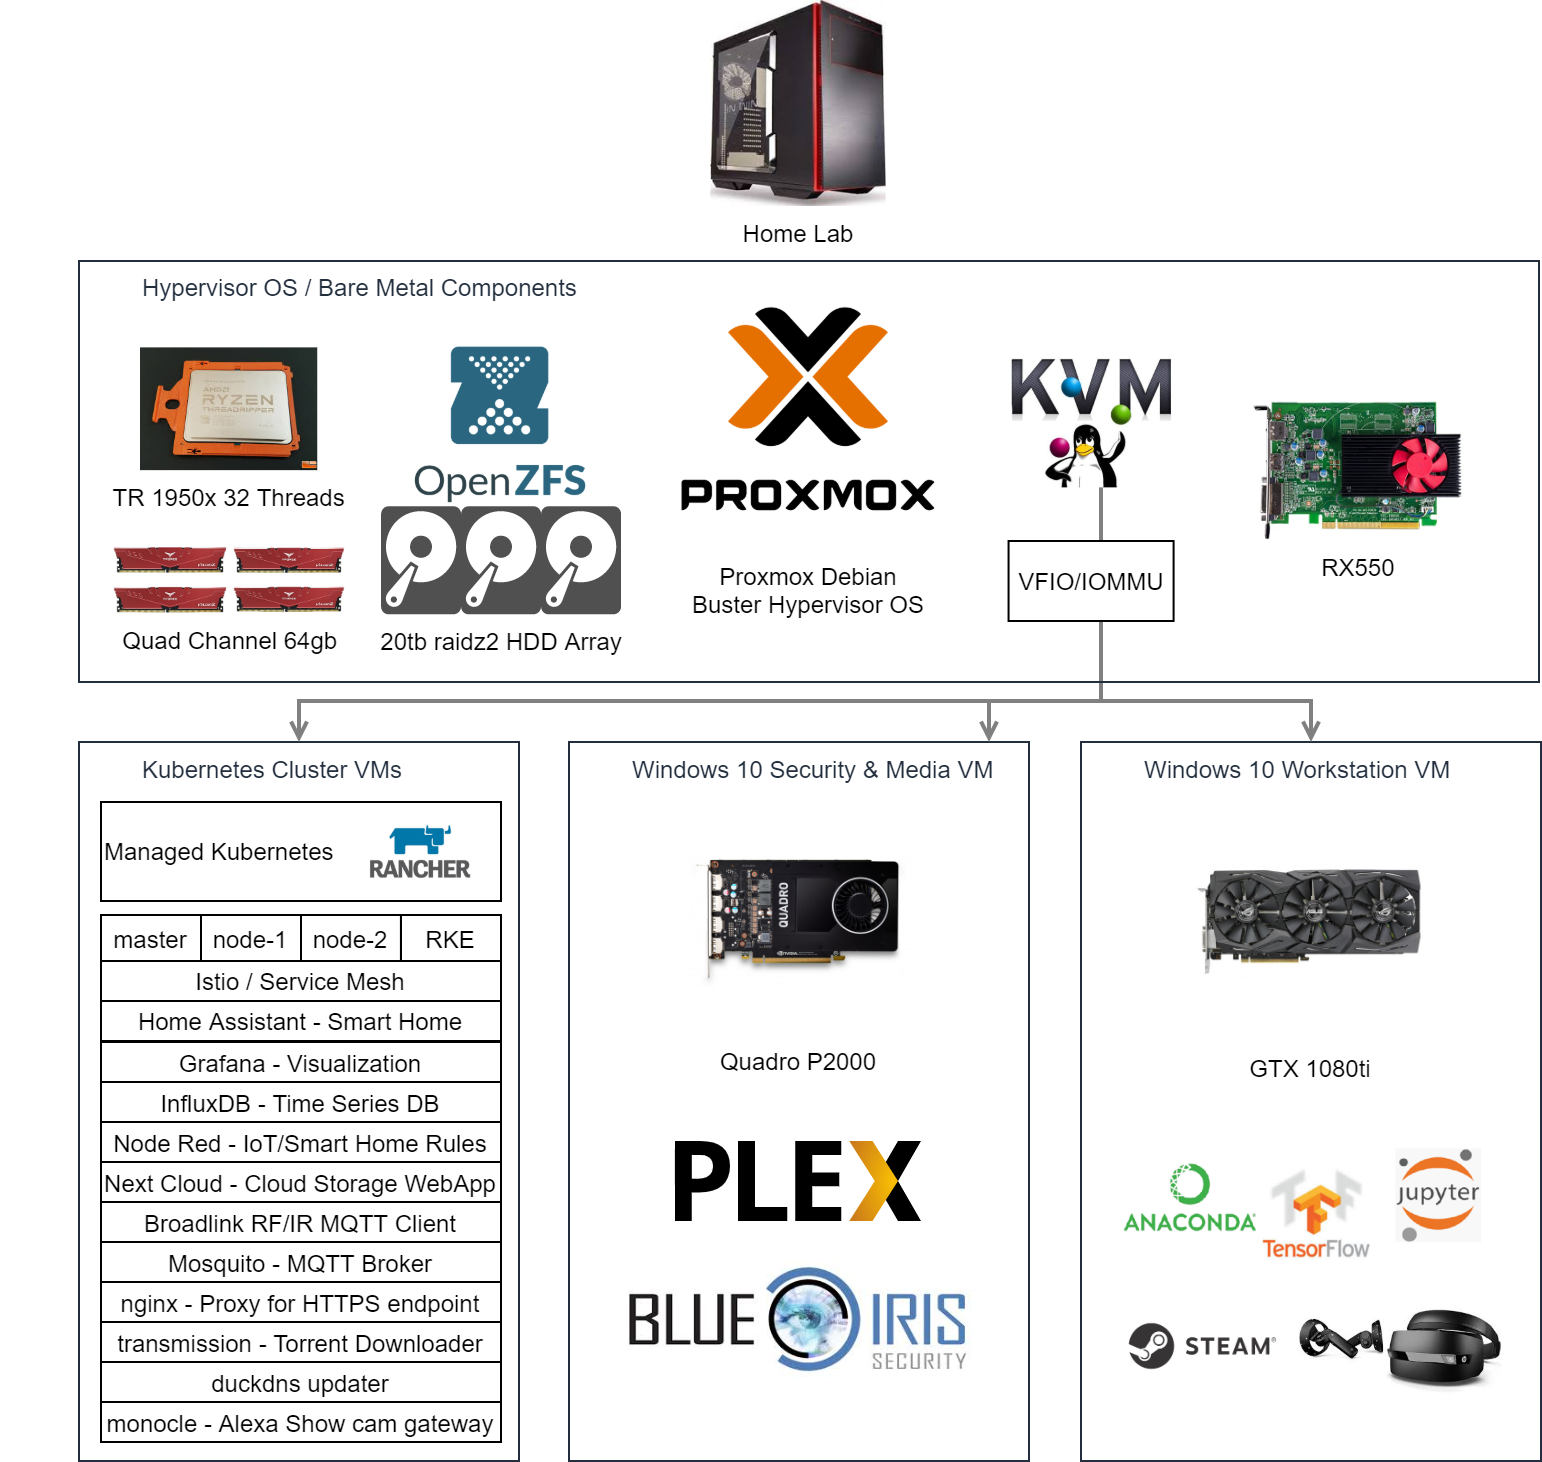
Long ago at end of 2019, I built my homelab machine that had an AMD Threadripper 1950X CPU with 16 Cores / 32 Threads and 128GB Ram, 20TB raidz1 Storage (OpenZFS) & 3 GPUs, one RX550 for the bare-metal OS which is in my case is Proxmox’s Debian Distribution, one GTX1080ti passed through to the Windows Virtual Machine I usually use as my workstation and still running solid and upgraded to windows 11 with virtualized TPM 2.0 chip virtualization support using Proxmox VE 7! The last one is a Quadro GPU passed through to another windows VM for Video Encoding Applications such as multimedia streaming and surveillance.
https://marketresearchtelecast.com/proxmox-ve-7-1-seamlessly-virtualize-windows-11-and-tpm-2-0/207313/
below diagram illustrates the build
in terms of networking, I have a thinkclient running pFSense as my router and connected to my eLife connection with dynamically allocated IP being updated to CloudFlare and hidden/proxied in cloudflare, this topic alone will leave it later to go through its details
These specs are far from what you need if you just want a workstation, but instead I was thinking to consolidate all my home compute and storage workload for smarthome (Homeassistant) and multimedia (Plex), Security Cameras (blueiris) and other useful home applications like nextcloud in a single machine. Plex and Blueiris are running on a 2nd windows virtual machine other than the workstation machine that has GTX1080ti, it instead has Quadro P2000 Passed through for NVENC to do its magic in saving CPU resources for multiple video streams encoding (Quadro allows you to encode more than 2 streams “around ~20 Full HD for P2000″, unlike consumer cards which are hard limited to 2). And on top of that, the same machine will be my own workstation, I had thoughts of creating 2 workstations using the same machine but I decided not to do so. Moreover this machine have helped me discover a lot of great opensource projects that are practical for work in general like rancher and nodered. perhaps in the future my setup will be Highly Available with another hardware Node just because :D. or maybe ill open another home for Disaster Recovery XD.
Building and operating your homelab at home opens a lot of possibilities to learn emerging technologies and slowly train your linux ninja skills. running and operating your own hardware down to the hypervisor management is a totally different story than operating on the cloud, where all your needed resources are just a click away. I want to get my hands more dirty and go through all the trouble of operating my own private cloud, because why not!
I have uploaded the first part of my series of videos for building the homelab in below link,
and the second part is uploaded today after the raw unedited video material was buried for about 2.5 years. even though the material is a bit old, but it is still quite relevant, heck it is more relevant now after the news coming out about VMWare in final stages of being acquired by broadcom, moreover broadcom CEO is leaving for another job today ![]() (My opinions are my own, VMWare is a great company, but with the new changes it seems wise to explore other hypervisors, especially KVM based).
(My opinions are my own, VMWare is a great company, but with the new changes it seems wise to explore other hypervisors, especially KVM based).
https://www.theregister.com/2022/07/11/mastermind_of_broadcoms_vmware_buy/
The first part of the video showcases the outcome of achieving a GPU performance with GPU passed through to VM almost identical to having that same GPU running on the machine bare metal.
The remaining parts walk through the installation and configuration to achieve this result.
the Main topic of this second video is how to passthrough a consumer GPU (GTX1080ti in my case) to a virtualized windows host running within the proxmox KVM based hypervisor. the topic is quite niche and it was really fun to troubleshoot the issues and find solutions and workarounds for the nvidia driver being blocked due to not being an “Business Grade” GPU (the infamous Nvidia Code 43 Error), however as far as I know, this driver lock has been already bypassed by nvidia themselves so you might not fall into such troubles being faced in the video while passing through an NVidia GPU to your VM.
In the below Github Repository Ill be updating the configuration files to help you on your journey to building your own homelab if you would like to follow the same path.
https://github.com/alsolh/homelab
Happy homelabbing :D, and I hope that Ill be returning back to my old hobby again because I really need to be up to date with the market changes and opensource technologies revolutionizing the market and IT industry.